Class 3 - Animations & Inter-class Access
本节课的重点是引入动画系统,学习如何制作动画,包括飞船尾焰、炮弹运�动,以及更多序列帧的爆炸动画。
Class 3 Overview
- 导入与整理素材,以及Prefab(预制体)概念的引入
- 使用动画窗口制作序列帧动画
- GameController:实例单例与生命周期
- 其余控制脚本
1. 导入与整理素材,以及Prefab(预制体)概念的引入
导入素材包中3-作为前缀的素材(飞船的两种状态)
-
按照规范的参数设置流程:PPU(每单位像素,48) -> Filter Mode(过滤模式,点) -> Compression(压缩,无)
-
选中主角飞船
ship0并完成以下 Inspector 设置:属性 设置值 Layer(图层) Player Transform.position (0, 0, 0) Rigidbody2D.BodyType(身体类型) Kinematic Use Full Kinematic Contacts(使用完全运动学联系) True(勾选) Animator (添加 Animator 组件) -
创建 Projectile(炮弹):
属性 设置值 Layer(图层) PlayerProjectile Sprite Renderer.Sprite(精灵) (任选两个炮弹中的一个,作为初始状态精��灵) Rigidbody2D.Gravity(重力) 0 BoxCollider2D (添加 BoxCollider2D 组件) Animator (添加 Animator 组件) 接下来,将场景中的Projectile对象拖入
Assets/Prefabs/SpaceShooter/,这样我们就会得到一个炮弹的预制体**预制体(Prefab)**是Unity中非常重要的概念,指的是可以重复使用的游戏对象模板。通过预制体,我们可以方便地在场景中实例化多个相同的对象,并且可以统一管理和修改它们的属性和组件。
-
创建 Asteroid(陨石/小行星):
对 6 种陨石,我们分别设置:属性 设置值 Rigidbody2D.Gravity(重力) 0 PolygonCollider2D (添加 PolygonCollider2D 组件) 而后同样的,拖入
Assets/Prefabs/SpaceShooter/生成各自的 Prefab -
创建 Explosion(爆炸)动画的场景对象: 创建一个空的 GameObject,命名为
Explosion:属性 设置值 Sprite Renderer.Sprite(精灵) (选择 spaaaaace_3作为初始精灵)Animator (添加 Animator 组件) 层级碰�撞设置找到Unity左上角的选项,Edit(编辑) > Project Settings(项目设置) > Physics 2D(2D物理),图层碰撞矩阵 一栏下取消
PlayerProjectile与Player,Player与Player的碰撞勾选,避免自伤。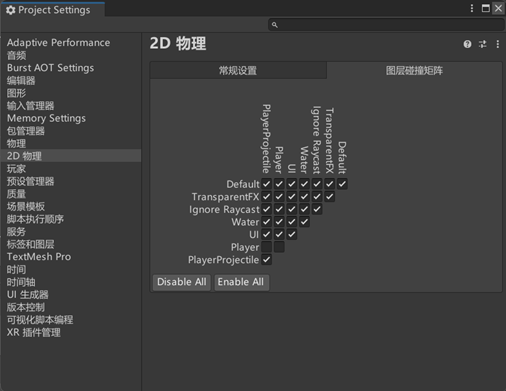
2. 使用动画窗口制作序列帧动画
打开 Window(窗口) > Animation(动画) > Animation(动画)
-
飞船的推进动画:
- 选择场景中
Player对象,点击 Animation 窗口中的 Create 按钮,保存为Thrust.anim - 设置
Sample(采样帧率)为 10,点击Add Property(添加属性)以添加 SpriteRenderer > Sprite 轨道 - 将两个不同的贴图(之前导入的
3-作为前缀的精灵)置于相邻关键帧(如 0:1 与 0:2),形成来回闪烁
- 选择场景中
-
子弹的推进动画:
- 同上
-
爆炸动画:
- 步骤同上。区别在于:
- ①
Sample(采样帧率)设置为20,并且序列帧较多,按素材顺序放入(3, 4, 6, 13, 2, 5这 6 张帧图) - ② 在 Project 底下选中
Explosion动画,在 Inspector 中取消勾选 Loop Time(循环时间),确保不循环播放
- ①
- 步骤同上。区别在于:
清理:以上 Prefab(子弹、陨石、爆炸)不要常驻场景内,后续均通过代码生成。
3. GameController:实例单例与生命周期
新建空对象 GameController,挂载脚本 GameController.cs。
using UnityEngine;

public class GameController : MonoBehaviour
{
    public static GameController instance; // static 单例

    public float timeElapsed; // 全局计时器

    void Awake()
    {
        Debug.Log("Awake?");
        instance = this;
    }

    void Start()
    {
        Debug.Log("Start?");
    }

    void Update()
    {
        timeElapsed += Time.deltaTime; //去除帧率影响的计时
    }
}
MonoBehaviour 无法 new。
我们只好将 instance 设为 public static,并在 Awake() 中 instance = this;,就能在其他脚本中通过 GameController.instance.timeElapsed 访问公共成员变量。
4. 其余控制脚本
- 飞船控制脚本:周期性自动以正弦波模式运动
public class Ship : MonoBehaviour
{
    void Update()
    {
        float yPosition = Mathf.Sin(GameController.instance.timeElapsed) * 3f;
        transform.position = new Vector2(0, yPosition);
    }
}
正如前文所说,本次飞船是
Kinematic类型的 Rigidbody,因此我们需要手动设置其位置来实现其自动移动,不依赖 AddForce。
- 陨石控制脚本:速度与出界回收
public class Asteroid : MonoBehaviour
{
    // Outlet
    Rigidbody2D rb;
    // State Tracking
    float randomSpeed;

    // Start is called before the first frame update
    void Start()
    {
        rb = gameObject.GetComponent<Rigidbody2D>();
        randomSpeed = Random.Range(0.5f, 2f);
    }

    // Update is called once per frame
    void Update()
    {
        rb.velocity = Vector2.left * randomSpeed;
    }

    void OnBecameInvisible()
    {
        Destroy(gameObject);
    }
}
说明:
velocity属性可以直接设置物体的速度,可在Inspector中于Rigidbody2D组件下,收起的 info 面板找到。OnBecameInvisible方法在物体离开摄像机视野时被调用,适合用于回收不再需要的对象。